Next: 3. Appendix Up: openfluid-engine_quickref_en Previous: 1. File formats Contents
The OpenFLUID-Engine application is available on Linux, Windows and MacOSX platforms. We encourage you to use OpenFLUID-Engine program on Linux platform as it is the development and usually used platform. The following instructions mainly applies to Linux platforms.
On linux platforms, the OpenFLUID-Engine software is available as distribution packages (deb, rpm) or archive files (tar.gz, tar.bz2).
The recommanded way to install is to use packages for your Linux distribution. If you want to use archive files, you have to unarchive the software according to the directory tree.
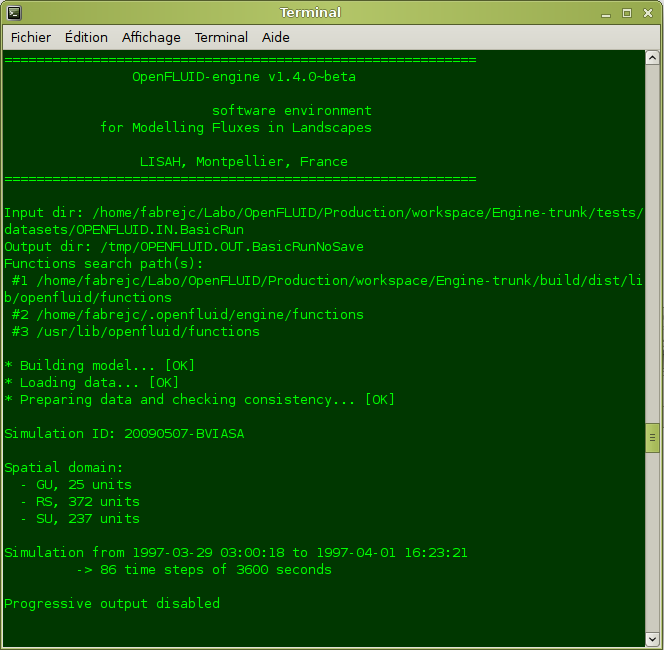
Once installed, the openfluid-engine command should be available. You can check it by running the command openfluid-engine --help or openfluid-engine --version in your favorite terminal. You are now ready to run your first simulation.
Before running the simulation, the input dataset must be built. An OpenFLUID-Engine input dataset includes different informations, shared into many files:
All these files must be placed into any directory that can be reached by the
engine. The default searched directory is a directory named
.openfluid/engine/OPENFLUID.IN and located into the user home
directory (the user home directory may vary, depending on the used operating
system). This directory is not automatically created, it should be created by hand.
If you prefer to place your dataset in another directory, you can
specify it using command line options passed to the engine (-i or --input-dir).
In order to build these files, we encouraged you to use a good text editor, or better, an XML editor. You can also use custom scripts or macros in specialized sotware, such as spreadsheets or Geographic Information Systems (GIS), to generate automatically the input dataset.
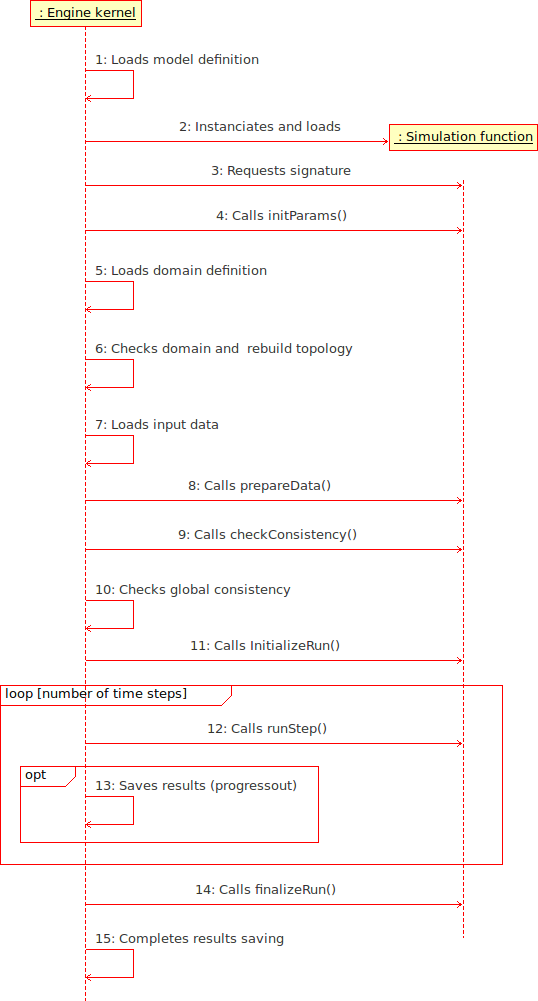
The following sequence diagram describes the stage-by-stage execution of an OpenFLUID-Engine-engine simulation. The kernel is the main application, and the simulation function represents each simulation function used in the model definition.
To run the simulation, if the dataset is located in the default searched directory, simply run the command openfluid-engine in your favorite terminal.
To specify a different input dataset directory, use the -i or --input-dir command line option.
The results are stored in files, gathered by spatial unit. In each files, the values for variables are stored as columns, each row corresponfing to a data exchange time step (represented as a date and time).
The format of the files depends on the configuration of outputs, set through the run.xml file.
The default output directory is a directory named .openfluid/engine/OPENFLUID.OUT and located into the user home directory (the user home directory may vary, depending on the used operating system).
If you prefer to save your outputs in another directory, you can specify it using command line options passed to the engine (-o or --output-dir).
In order to process the results of your simulations, we encourage you to use software environments such as R, Scilab or Octave, spreadsheets such as OpenOffice Calc, GIS such as GRASS or QGIS.
Buddies are small tools that help scientific developers in order to complete the modelling and/or development works. They are usable from the command line, using the --buddyhelp, --buddy and --buddyopts options. Four buddies are available:
Options are given to buddies through a comma-separated list of key=value arguments, using the --buddyopts command line option.
General usage is:
openfluid-engine -buddy buddyname -buddyopts abuddyopt=avalue,
anotherbuddyopt=anothervalue
The func2doc buddy extracts scientific information from the source code of simulation functions. It uses the function signature and LATEX-formatted text placed between the <func2doc> and </func2doc> tags (usually into C++ comments). From these sources of information, it builds a LATEX document which could be compiled into a PDF document and/or HTML pages.
The func2doc buddy can also use information from an optional sub-directory named doc, located in the same directory as the input source file. The information in the doc subdirectory should be linked to the information from the source code using LATEX \input command.
Required options:
| inputcpp | path for cpp file to parse |
| outputdir | path for generated files |
Other options:
| html | set to 1 in order to generate documentation as HTML files |
| set to 1 in order to generate documentation as PDF file | |
| tplfile | path to template file |
Usage example:
openfluid-engine -buddy func2doc -buddyopts inputcpp=/path/to/cppfile.cpp,
outputdir=/path/to/outputdir,pdf=1
The newfunc buddy generate a skeleton source code of a simulation function, using given options.
Required options:
| cppclass | C++ class name of the function |
| funcid | ID of the function |
Other options:
| authoremail | email(s) of the author(s) of the function |
| authorname | name(s) of the author(s) of the function |
| outputdir | path for generated files |
Usage example:
openfluid-engine -buddy newfunc -buddyopts funcid=domain.subdomain.process.method,
outputdir=/path/to/outputdir
The newdata buddy generate a skeleton dataset.
Required options:
| outputdir | Output directory for generated dataset |
Usage example:
openfluid-engine -buddy newdata -buddyopts outputdir=/path/to/outputdir
The convert buddy converts a dataset from a specific version format to another one. Currently, conversion is only possible from 1.3.x format to 1.4.x format.
Required options:
| convmode | Conversion mode. Available modes are: 13_14 |
| inputdir | Input directory for dataset to convert |
| outputdir | Output directory for converted dataset |
Usage example:
openfluid-engine -buddy convert -buddyopts convmode=13_14,
inputdir=/path/to/inputdir,outputdir=/path/to/outputdir
Jean-Christophe Fabre 2009-12-11